How to Make a Homemade Club Banner Stand
Aug 10
Benefits of a Do-It-Yourself Banner Stand
Every type of banner stand has their disadvantages. I believe that for many clubs, the best solution is to make your own.
Inspired by the examples of other Toastmasters have build banner stands, such as the very tall version from District 53 or the one mentioned in District 37 Sergeant At Arms training or the beautiful painted banner stand from Star Search Toastmasters with plenty of space to display ribbons, I decided to give it a shot.
Note: these instructions are for the new, post-rebranding club banners. The size and structure are slightly different, so you may need a different approach for an old banner.
PVC pipes are cheap and easy to assemble a frame with. It’s like Tinker Toys for grown-ups! Bear in mind that you do not have to follow these instructions exactly. Feel free to play around and try different approaches, different structures. You may want to get some extra parts to allow for such experimentation.
This frame is designed to be unobtrusive; stable enough to hold the banner without falling apart or over, but most of the frame is hidden by the banner. It can easily be broken down and reassembled, to simplify transport.
Equipment
- PVC Cutter (or you can use a hacksaw or such to cut the pipe if you prefer—but I feel the PVC cutter is easiest and makes the cleanest cuts)
- Tape measure (optional – again, precision isn’t vital for the most part)
- Permanent marker (optional, but it helps make assembly easier)
- Power drill
- Drill bit matching the size of the screws you use
Parts
- Two 3/4″ diameter PVC pipes
- Two 3/4″ PVC 90 degree elbow joints
- Four 3/4″ PVC end caps (optional)
- Four 3/4″ PVC Tee joints
- Spraypaint (optional – I didn’t use it)
- Two long, thin screws, or better yet, square bend screw hooks
Cutting
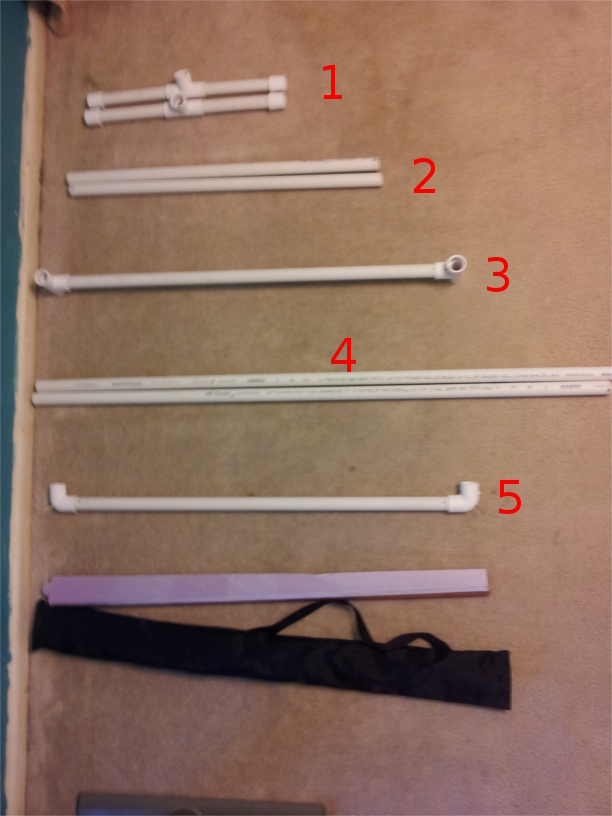
Cut the pipes into pieces as follows. You will have some length left over. The exact lengths don’t usually matter, but try to make sure the same types of pieces match in length. If you don’t care to use a tape measure, just put the uncut piece next to the cut piece and cut them so they match in length.
Writing numbers on the pieces with the marker is optional. I find it helps people more easily remember how to assemble the frame, but if you plan to spraypaint the frame, skip that step.
- Four 6″ lengths. Use the marker to mark these as “1”
- Two 27″ lengths. Mark these as “2”
- Two 31″ lengths. Mark one as “3” and one as “5”
- Two 46″ lengths. Mark these as “4”
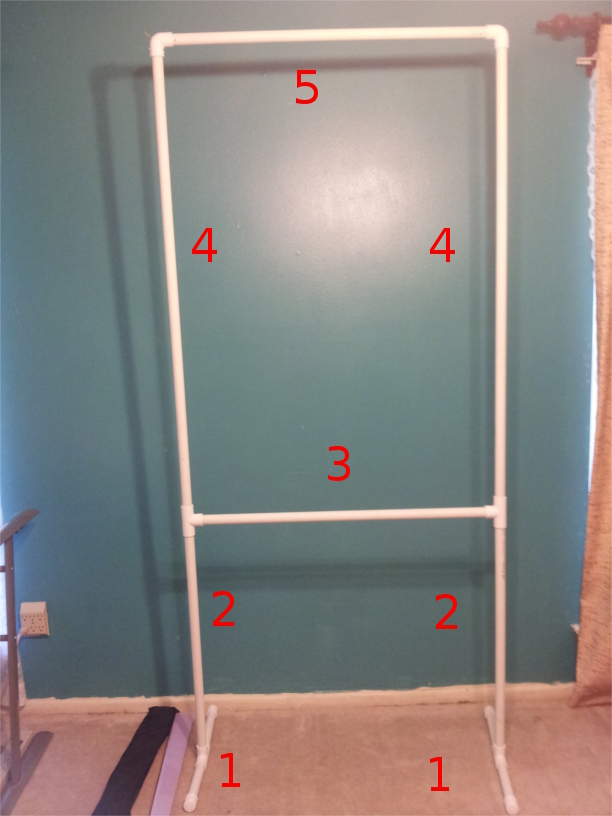
Assembly
- Put one end cap on each “1” piece. These will be the feet of the banner stand
- Connect two “1” pieces to the opposite ends of two of the tee joints
- Connect the “2” pieces to the right angle socket of the above tee joints. These are the lower vertical supports.
- Connect the last two tee joints to the other ends of the “2” pieces
- Connect the “3” piece between the two legs so far assembled, at a right angle to the “2” pieces. This is a crossbeam to add stability.
- Connect the “4” pieces on top of the “2” pieces. These are the upper vertical supports.
- Connect the elbow joints to the top of the “4” pieces.
- Connect the “5” piece between the elbow joints on the “4” pieces. This is the top crossbeam, what the banner attaches to.
Holding the Banner
The banner frame is not QUITE finished at this stage. You need something to attach the banner to! Sure, you could clip the banner cord to the frame somehow, or screw eyehooks to the top bar and hang the rope from that–but with a little care, you can make the frame practically invisible behind the banner.
Drill a hole matching the size of your screws into each of the elbow joints. The angle is tricky; when the frame is assembled and you are looking at it, you want the screw to be jutting a little forward, a little up, and a little off to the side. The exact angle is hard to measure, as it depends on the exact length of your top crossbeam and exactly where you drill in the elbow joint. It took me several tries; if you make a mistake, just keep trying. Wouldn’t hurt to have extra joints or screws though.
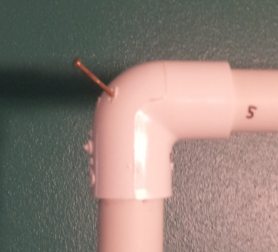
Yes, that is a nail in the picture, because that is what I had laying around. I would definitely not recommend that. PVC pipe does not like nails very much.
Once you have the screws at just the right angle and length apart, you can put on the banner. You can remove the cord; all you need are the eyehooks on either side of the banner rod. Hook them onto the screws.

As you can see, if the screws are jutting out just right, the banner is held just above the top of the stand, and is slightly wider. You mainly just see the banner, not the stand.
Disassembly/Assembly
The frame can be disassembled with relative ease as well. Pull the pieces apart (leave the caps and joints on) and put them in a container that can hold the pipes of varying sizes. I, having absolutely no aesthetic sense, used a zip tie garbage bag, but I’m sure you can find something better.
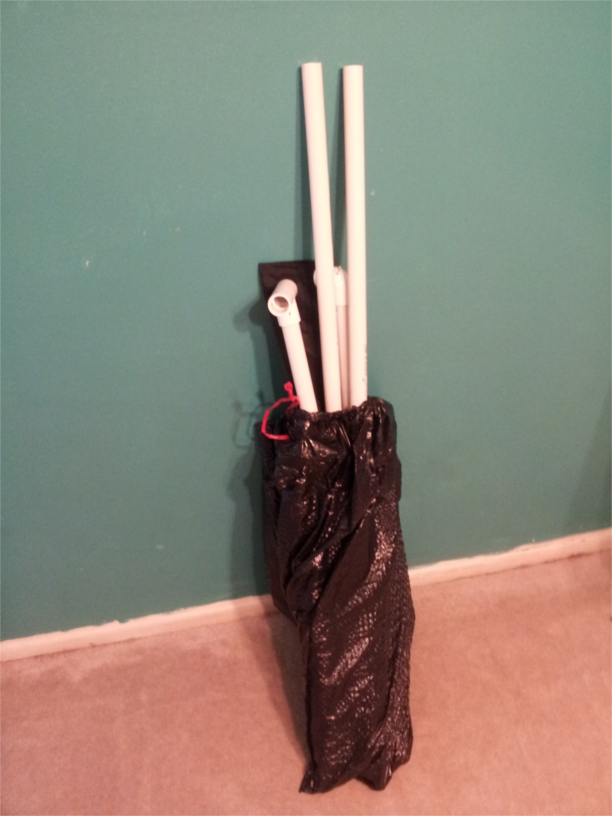
When assembling, people simply need to remember to start from the bottom up, from the lower numbers to the higher.
Opportunities for Improvement
In my first iteration, I made the frame far larger than it needed to be, deciding too large was better than too small. This made it a little bit harder to store and carry, but it positively loomed in the meeting space. The feet of the frame were also far longer than necessary, causing it to take up more floor space and making it more likely that someone would trip over it. I took two eye hooks and screwed them into the top crossbeam (no drill),but didn’t like the look of the banner hanging from the frame, the top crossbeam quite obvious over the banner.
In the second iteration I scrounged for what I had laying around and made some adjustments. Using nails was a mistake. The frame would look much nicer if spraypainted some color, but I decided to aim for making the frame disappear behind the banner instead.
It would be possible to build a more complex frame, perhaps holding two banners, or a banner and a rack for ribbons, or to build the frame in a way easier to carry it in district conference banner parades.
Still, I’m content with the frame so far, and suspect it will serve us well for years to come. But if not, PVC is cheap, and it’s easy to cut some pieces and put them together in a different fashion. Feel free to experiment!
Do you have a better homemade banner stand? Tell all in the comments below!
 Blog RSS Feed
Hi! This is really helpful. What are the dimensions of your banner? I need to make stands for 2.5′ x 4′ vertical banners. I’m wondering whether your PVC measurements would work for me, and if not, how I should adjust the measurements to better fit my banners. Thanks in advance!
The new Toastmasters banners are 47 inches tall and 35 inches wide, according to http://www.toastmasters.org/en/Shop/district-leaders/Event-Supplies/Customized%20Banner%20ships%20separately_322.aspx
The measurements do not need to be precise. The only part that matters is setting the nails or hooks to rest the banner on, if you are attaching directly to the ends of the banner rod. If you are hanging it by a cord, even that can be fairly imprecise.
My advice would be to get some PVC pipe and a PVC pipe cutter tool, then cut the pipes larger than you need. With the pipe cutter, it only takes a second to cut them shorter, so you can gradually work towards the perfect dimensions for yourself. Hope that helps!
It does, thanks!
THANK YOU! This is great!